
This is an old revision of the document!
Table of Contents
— Marc Verhaar 2022/07/13 13:30

Git configuration
Get username:
git config user.name
Set username:
git config --global user.name "Marc Verhaar"
Get mail address:
git config user.email
Set e-mail address:
git config --global user.email mcamav@gmail.com
Set default editor :
git config --global core.editor "vim"
Git repo's
A Git repo (or repository) is a place where data (files) is stored. A repo is a collection of files in a directory and using git, changes to these files are tracked. Using git you are able to revert changes, split branches, etc. Anytime we want to use Git with a project, app, etc, we need to create a new git repository. We do this by creating a new directory which will hold the files and then initialize the directory to become a git repository. We can have as many repo's on our machine as needed, all with separate histories and contents.
Committing workflow
- Each commit is a snapshot in time to which you can return.
- Each commit has a little message that tells something about (the reason of) the commit (or should have)
- Each commit has at least 1 alteration to 1 file in the repository/directory (you cannot commit without a single change) but can have any number of changes in any number of files (within the repository). It is up to the user to decide when to commit (number of changes in number of files).
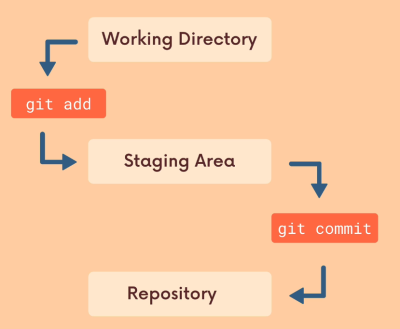
- The committing workflow is a multi step process:
- git init: only done once per repository, check beforehand using git status. This creates the subdirectory .git which is the actual git repository.
- work on files, add files, delete files, save files, modify files, etc. This is done in the working directory.
- select which files you want to make part of the commit (staging). Using the git add command you select which files are staged (or copied to the staging area)..
- commit changes using git commit. The files (changes) in the staging area are added into the repository (the .git subdirectory).
Understanding the .git folder
- Directory in the top-level directory of a git repository.
- Contains files and directories for tracking data
- Is first created when runnning git init.
Git commands
git init
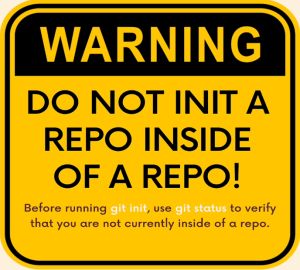
is used to create a new git repository. Done only once per project from the top-level directory containing your project. It's a good measure to check using git status if you are not already in a (sub)directory monitored by git before using git init.
git status
gives information on the current status of a git repository and its contents. Can run from the top-level directory of a git repository but also from a subdirectory displaying the same result. It's good practice to issue this command regularly to be aware of changes not yet staged (and committed).
git add
used to “stage” selected files before committing them.
Examples:
git add file1 file2
git add *
git add .
- The 1st command adds file1 and file2 to the staging area.
- The 2nd adds all files to the staging area.
- The last command adds all changes to the staging area (same as 2nd?)
You can now check using git status.
git commit
is used to actually commit changes from the staging area. When making a commit it's good practice to provide a commit message that summarizes the changes and work snapshotted in the commit.
git commit <enter>: will open your standard edit to enter the committing message.
git commit -m “message”: will commit using “message” as the committing message.
Regarding commit messages:
- Recommended style is using present-tense imperative: “make xyz do abc” instead of “makes xyz do abc” or “made xyz do abc”.
- For long commit messages it is easier to use an editor
- If using a long message, make the 1st line a short summary so you can more easily browse using git log –oneline.
Combining staging and committing:
It is possible to stage files and committing them in a single command:
git commit -a -m "stage and commit all files"
This only works with existing files already staged! New files need to be staged first!
git commit --amend:
If you forget to add an important file to a commit, or you made a typo in the commit message that you want to correct. Instead of staging and performing a new commit you can do the following:
git commit -m "wrong message"
git add forgotten_file
git commit --amend (-m "right" message")
This only works for the latest commit!
git log
check commit history. Git log has a lot of options (https://git-scm.com/docs/git-log) but one option that is really handy to use is git log –oneline which will display one line of commit message
Git ignore
We can tell Git which files and directories to ignore using a .gitignore file. This is very useful for files you know you never want to commit like:
- Secrets
- API keys
- Credentials
- Operating System files (.DS_Store on Mac)
- Log files
- Dependencies and packages
- etc
The .gitignore file (usually) in the root git directory (highest level) and files and directories can be defined within the file.
Example of a .gitignore file:
.DS_Store
directory1/
*.log
directory2/*.txt
This file can become a long listing. To get started on filling it with some useful thing, check https://gitignore.io
 The .gitignore file itself should be tracked and not be in the listing!
Atomic Commits
When possible, try to do a commit for a single feature, change, of fix! This makes it much easier to undo or rollback changes later on. It also makes your code or project easier to review. So get used to committing often when using git.
Git branching
What is branching?
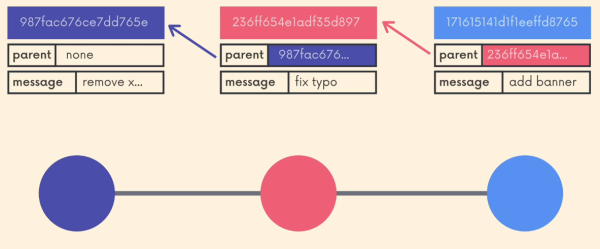
Branching is done when multiple people are working on the code or multiple paths of development are persued or tested. In a later time these branches are possibly deleted or used in the code. Branches are an essential part of Git and you can think of them as alternative timelines for a project.
They enable us to create seperate contexts where we can try new things or work on multiple ideas in parallel.
If we make changes in one branch they don't impact the other branches (unless these changes are merged).
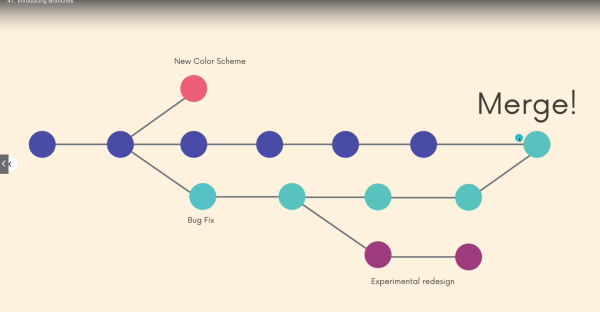
The default branch is called the master branch. It is not different in any other way from other branches. Many people and organizations designate the master branch as the “source of truth” or the “official branch” for their codebase but from a technical point of view it is just like any other branch.
Understanding Git Head
When exploring git commits, the most recent commit will show a “HEAD → master” section:
commit 25b21a7e9ed236214ef9b429ab9e6be72c6b09e4 (HEAD -> master)
Author: nomind69 <mcamav@gmail.com>
Date:   Tue Jun 8 08:38:35 2021 +0200

    Add a new file
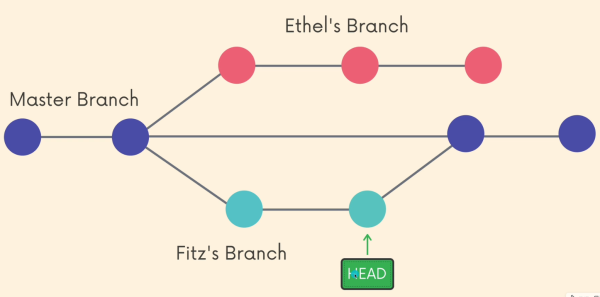
Head is a pointer that refers to the current 'location' in your repository; it points to a particular branch reference. Think of it as a bookmark where only 1 bookmark can be read at a time. Up till now this was always the last commit of the master branch.
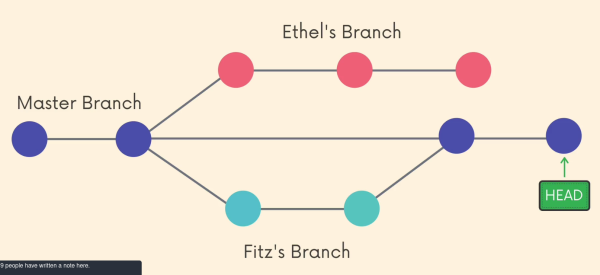
When switching to another branch, the HEAD is located at the last commit of that branch.
Git Branch related commands
| Command | Result | Information | Output |
|---|---|---|---|
git branch --help | shows git branch options | NAME git-branch - List, create, or ... SYNOPSIS... |
|
git branch | show branches and current branch | The default branch is master though you can configure this. Look for the ***** which indicates the branch you are currently on. | * master test |
git branch -v | show branches, and latest commits of each branch | * master 02f4f9b add file test 7fdd15e change file |
|
git branch test | create new branch test | By adding a non-existing branch name you create a new branch based on current HEAD. You are not automatically active in the newly created branch! | no output |
git switch -c new_branch | create and switch to branch new_branch | This is the new way of working (vs checkout). | Switched to a new branch 'new_branch' |
git switch test | switch to test branch | This is the new way of working (vs checkout). | Switched to branch 'test' |
git checkout test | also switches to test branch. | The checkout option is older and it can do some more stuff that will be studied later. | Switched to branch 'test' |
git checkout -b new_branche | create and switch to branch new_branch | The checkout option is older and it can do some more stuff that will be studied later. | Switched to a new branch 'new_branch' |
git branch -m newname | rename/move old branchname to newname | You need to be in the branch you want to rename/move! | no output |
git branch -d branchname | delete branch branchname | You must be in another branch to delete! Also, when you have not merged the branch you want to delete it will fail | |
git branch -D branchname | delete branch branchname | You must be in another branch to delete! This will delete the branch, merged or not! | |
git branch -r | check branches on remote | For this to work we need to setup a remote/origin first | |
Merging Branches
In the end, branches are created to merge with the main branch (whatever name you use for that) (or, if a branch is not good enough to implement, deleted).
The 2 important concepts to remember regarding merging branches:
- We merge branches, not specific commits!
- We always merge to the current HEAD branch (i.e. the branch we are working in)
The process:
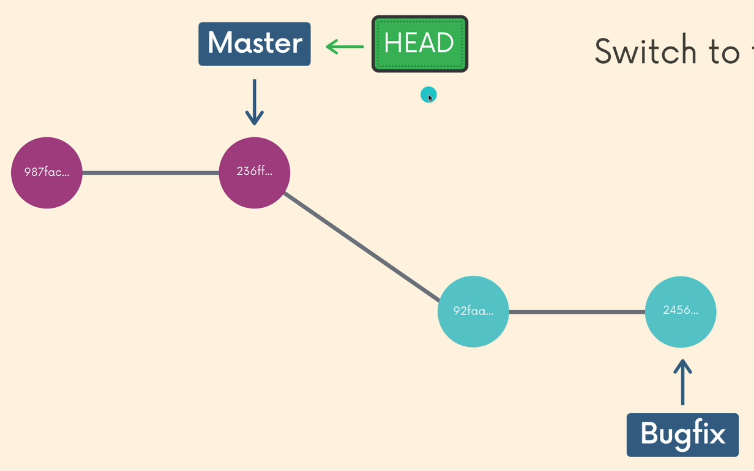
Let's say we are working on a bigfix in branch bugfix:
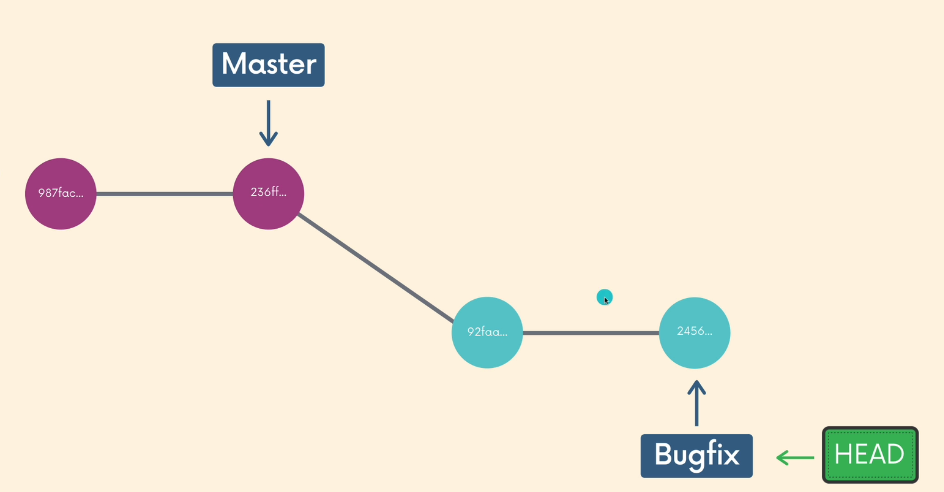
At this moment the HEAD is pointing to the latest bugfix branch commit. If we want to merge the bugfix branch into the master branch (implement the bugfix basically) we first need to change into the master branch:
git switch master
Now the situation is this:
Now we can use the merge command:
git merge bugfix
The desired situation now looks like this:
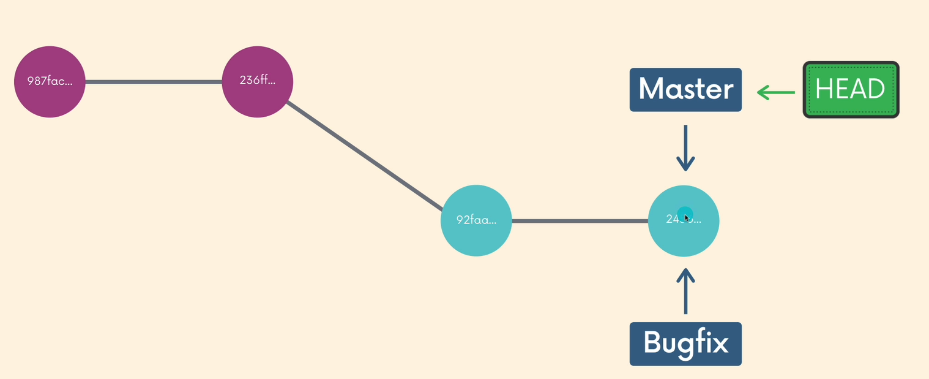
This type of merge is called a fast forward merge as it really just moves the HEAD.
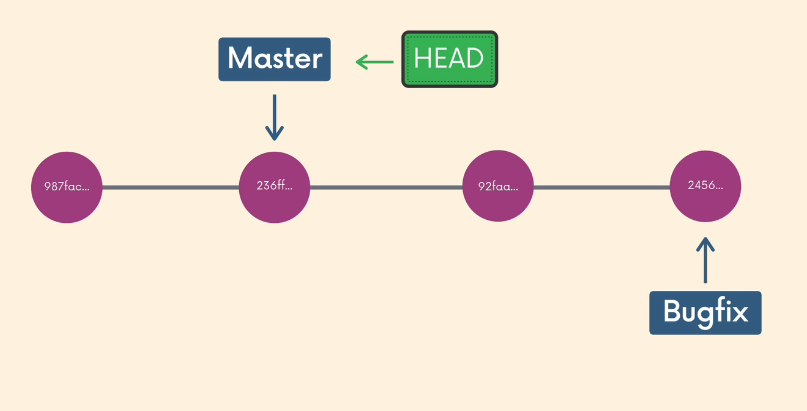
Another way of visualizing is like this:
Begin situation (where we are working on the bugfix branch):
After the merge:
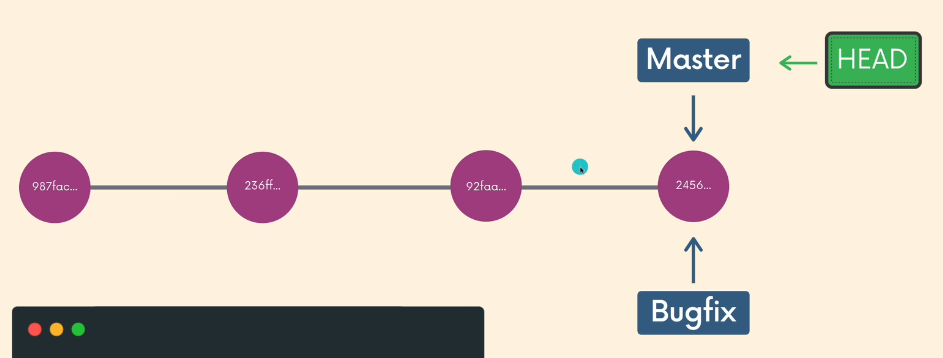
** After merging the branch you merged with still exists!**
Other types of merges:
Besides the fast forward merge there are other types as well:
Fast forward merge: No changes were made on the the branch you want to merge. If you created a bugfix branch and after fixing the code you merge it with the master branch on which no changes were made is called the fast forward merge.
When changes were made on the master branch we get a merge where 2 branches are the parents of the new commit! If there are no conflicts between the branches git can handle this without issues.
Merge Conflicts:
Depending on the specific changes you are trying to merge, Git may not be able to automatically merge. This results in merge conflicts which you need to resolve manually!
If a conflict exist Git will tell you when you try to merge branches. The message looks something like this:
CONFLICT (content): Merge conflict in foo.txt
Automatic merge failed; fix conflict and then commit the result
This can be the result of changes in the same file on different branches. Shown in Gitkraken it will look something like this:

If we open the file which has the conflict we see that git has changed the context of the file to indicate where the conflicts are:
original file master branch
<<<<<<< HEAD
nieuwe tekst in branch1
=======
nieuwe tekst in branch2
>>>>>>> branch2
To solve the conflict we need to:
- Open the file(s) containing the conflict(s)
- Edit the file(s) to remove the conflict(s). Decide which branch's content you want to keep in each conflict or keep the content from both/multiple.
- Remove the conflict “markers” (“«««< HEAD”, “=======”, and “»»»> branch2” in the example)
- (Re)stage the file(s) and make the commit.
**Most code editors (or IDE's) have functions that will help you resolve the merge conflict(s). It may be wise to configure an IDE as your standard editor for this.
Also Gitkraken has tools to resolve merge conflict(s)**
Git Diff: Comparing changes
The git diff command is used to view and compare changes between:
- commits
- branches
- files
- working directory
- and more…
It is often used alongside commands like git status and git log to get a better picture of a repository and how it has changed over time.
If we make changes to some files and we did not yet stage them, git diff will list all the changes in the working directory that are NOT staged for the next commit. In other words:
Without additional options, git diff lists all changes in our working directory that are NOT STAGED for the next commit.
Output follows a standard output. For example if we take this file with 2 versions:
| Last Commit | New Changes |
|---|---|
| red | red |
| orange | orange |
| yellow | yellow |
| green | green |
| blue | blue |
| purple | indigo |
| violet |
Now if we do git diff the output is:
git diff
diff --git a/rainbow.txt b/rainbow.txt
index 16c4f5d..26ec8e7 100644
--- a/rainbow.txt
+++ b/rainbow.txt
@@ -3,4 +3,5 @@ orange
 yellow
 green
 blue
-purple                  # text is red
+indigo                  # text is green
+violet                  # text is green
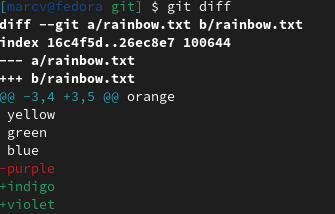
What these things mean:
| Output | Meaning |
|---|---|
diff --git a/rainbow.txt b/rainbow.txt | These are the files and versions that are looked at |
index 16c4f5d..26ec8e7 100644 | Some metadata, not important. The first 2 numbers are harshes of the files being compared. The last number is an internal file mode identifier |
--- a/rainbow.txt +++ b/rainbow.txt | Changes in “file a” will be marked using “-”, changes in “file b” are marked with “+” This does not tell you which file (branch or commit) is which! |
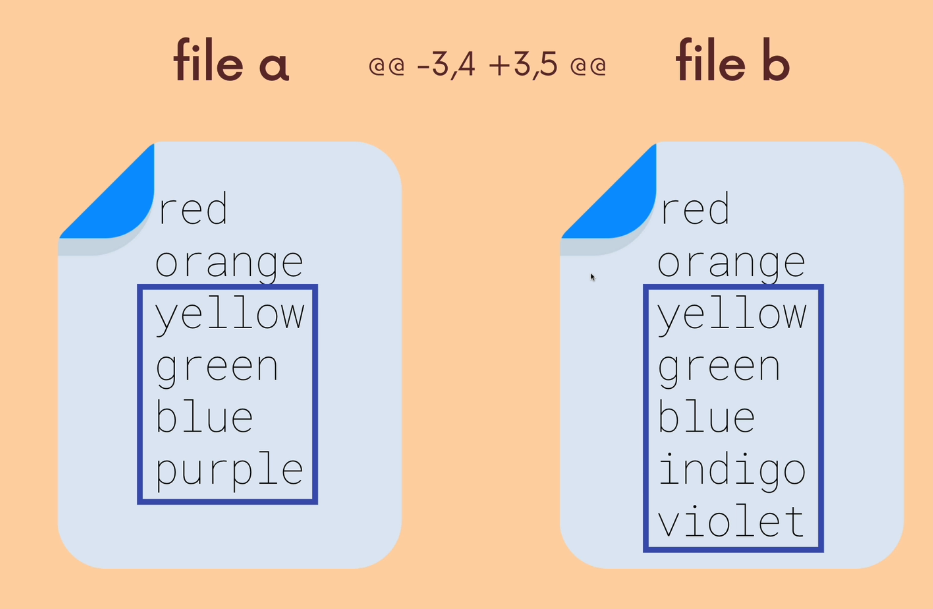
@@ -3,4 +3,5 @@ orange | This tells you where the changes are made. The 1st set (-3,4) are changes in file a, the 2nd set (+3,5) in file b. In file a, starting from line 3, 4 lines were extracted in the next lines and from file b 5 lines are extracted starting from line 3 (see screenshot below diagram!) |
yellow green blue -purple # text is red +indigo # text is green +violet # text is green | The extracted lines from the files to show the changes. The way you read this: The lines “yellow”, “green” and “blue” are present in both file versions, “purple” is present in file a but not in file b, “indigo” and “violet” are only present in file b |
| Command | What it does |
|---|---|
git diff | Compares Staging Area and Working Directory (meaning only unstaged changes are listed!) |
git diff HEAD | Lists all changes in the Working Directory since your last commit (meaning both staged and unstaged changes are listed!) |
git diff --staged git diff --cached | Lists the changes between the staging area and our last commit. In other words; show me what will be included in my commit if I run git commit right now |
Comparing specific files using git diff
We can also specify which file we want to examine by adding a filename:
git diff HEAD filename
git diff --staged filename
git diff file1 file2
etc...
Comparing branches using git diff:
git diff branch1 branch2
git diff branch1..branch2
This will list the changes between the tips of branch1 and branch2.
Here the “a file” is always the file from the branch you name first!
Comparing commits using git diff
To compare two commits provide git diff with the commit hashes of the commits you want to compare:
git log --oneline
5499a66 (HEAD -> master) add color
5d197a7 add color
617bff0 add color
3914c09 initial commit

git diff 5499a66 617bff0
diff --git a/rainbow.txt b/rainbow.txt
index 1d5d785..9ff4bc6 100644
--- a/rainbow.txt
+++ b/rainbow.txt
@@ -6,5 +6,3 @@ blue
 indigo
 violet
 blauw
-root
-paars
Notice that here also the first used commit hash is presented as “file a”. It may be a bit easier to view changes specifying the oldest file (commit) first!
If you would like to view changes between the current commit (HEAD) and the previous one you can use “HEAD~1” which defines the parent commit of HEAD:
git diff HEAD HEAD~1    #meaning compare HEAD with parent of HEAD or
git diff HEAD~1         #meaning compare parent of HEAD with HEAD (which puts the older version first for readability)
Visualizing Diffs with GUIs
Tools like Gitkraken also offer tooling to view differences between commits and branches and a way to edit these files!
Selecting multiple files (using shift key) also shows the files that were changed in between. Using a tool like Gitkraken offers an IDE feel when working on changes much more than Git itself.
Also Gitkraken offers the possibility to look at single changes (called hunks or chunks, depending on the tool that is used) instead of looking at all the changes in a particular file.
Git Stashing
The command git stash is used to be able to change to another branch while having uncommitted changes on the branch you are coming from!
If you switch branches while you have uncommitted changes in the branch you are leaving one of these thing will happen:
- The changes come with me to the destination branch or..
- Git won't let me switch if it detects potential conflicts.
If you don't want to commit (yet) but you do want to switch branches without having the changes come with you, you need to stash:
| Command | Outcome |
|---|---|
git stash # or git stash save | This command helps you save the changes that you are not yet ready to commit. You can stash changes and then come back to them later. In other words; it will take all uncommitted changes (staged and unstaged) and stash them, reverting the changes in your working copy! |
git stash pop | Will reapply the changes to the files (from the latest stash). You would normally use this when you get back to the branch you were working before stashing. It will also empty the (latest) stash! |
git stash apply | Same as git stash pop (apply changes saved in latest stash) without removing the existing (latest) stash. |
git stash list | Show saved stashes: Allthough rarely used you can use git stash multiple times stashing different versions. When ready you can choose which stash to apply by doing git stash apply stash@{2} where the last argument is the version you are reverting to. git stash list shows which stashes are available. |
git stash drop stash@{2}
| will “drop” stash 2. You can use this when you do not want to apply the stash you saved. Remember to use git stash list to show the stashes available to you. |
git stash clear | Removes all stashes |
git stash pop and git stash apply (without arguments) will apply the last stash if multiple stashes exist.
Undoing Changes & Time traveling
Git Checkout
The git checkout command is like a git Swiss army knife. Many people think it is overloaded which is what lead to the addition of the git switch and git restore commands.
We can use git checkout to create branches, switch to new branches, restore files and undo history. When we are working on the latest commit you can picture the situation like this:
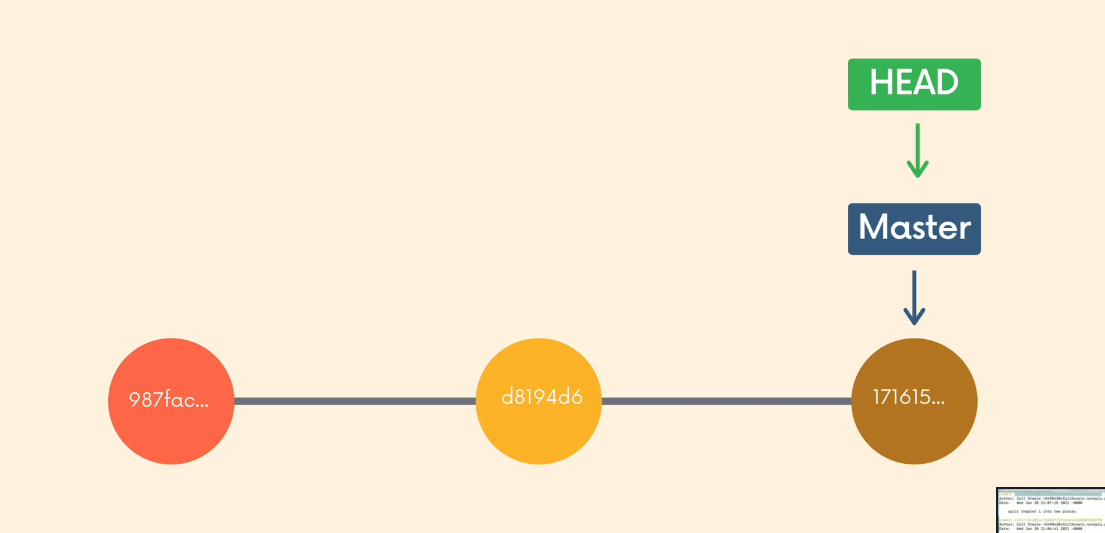
When we want to view an earlier version of the document(s) we move the HEAD: This is why we get a warning about detached HEAD!
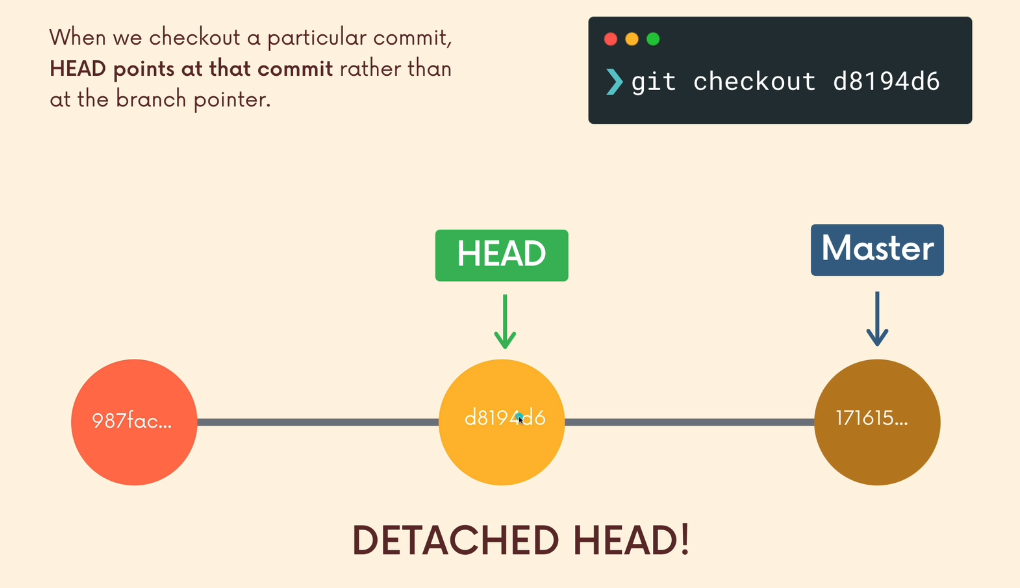
Detached HEAD state: When in this state we can do a couple of things:
- Stay in detached HEAD to examine the contents of the old commit. Poke around, view the files, etc.
- Leave and go back to wherever you were before / reattach the HEAD
- Create a new branch and switch to it. You can now make and save changes in the new branch since HEAD is no longer detached (attached to the latest commit of the new branch)
| Command | Result & Information | |
|---|---|---|
git checkout d8194d6 | View previous commit. By using the commit-hash we can view a previous commit. We can use git log to view the hashes. We just need the first 7 digits of the hash. | Using this command will trigger a warning: You are in 'detached HEAD' state. You can look around, make experimental changes and commit them, and you can discard any commits you make in this state without impacting any branches by switching back to a branch… We are effectively shifting HEAD to another (earlier) position in the branch |
git switch master | Besides switching to another branch this command also reattaches the HEAD to the latest commit of the (master) branch | |
git switch - | Reattaches HEAD to the latest commit of the current branch | |
git checkout HEAD~1 | Switch to the commit before current HEAD | This means you can issue this command multiple times in a row which will switch to an earlier commit every time! |
git checkout HEAD~2 | Switch to 2 commits before current HEAD | |
git checkout HEAD <filename(s)> git checkout -- <filename(s)> | Undo changes to <filename(s)> reverting to the state of the last commit (reverting back to HEAD) | |
Git Restore
The git restore command is a (new) command that helps with undoing operations.
Because git checkout does a lot of different things, git restore was introduced as alternative to some of the uses for git checkout.
Using git restore we can:
- Restore files to a previous state
- Unstaging files
| Command | Outcome & Information | |
|---|---|---|
git restore <file-name> | Resetting the file to the state of last HEAD. Even if you saved the file, this will reverse to the latest HEAD (commit) state. This command cannot be undone! If you have uncomitted changes in the file they will be lost. Equivalent of git checkout HEAD <file-name> |
|
git restore --source HEAD~1 app.js | Restore app.js to the previous HEAD (commit). This means that we if we need to specify a HEAD other than the latest commit, we use –source <hash or HEAD~x> We have NOT “timetravelled” to another commit!! We just restored a file to the state of a particular HEAD. This also means that git status will show that the file was changed comparing it to (current) HEAD. Also, we now can issue git restore app.js to apply the current HEAD state of the file! |
|
git restore --staged <filename> | When you accedentally added a file to your staging area with git add but you don't want to include it in the next commit, you can use this command to remove it from staging. | |
Git Reset
The git reset is used to reset the repo back to a specific commits; the commits are gone! For example you may want to use this when realizing that a couple of commits were not supposed to be on the master branch. To undo these commits you can use git reset.
There are 2 types of resets:
- regular reset
- hard reset
| Command | Result & Information | |
|---|---|---|
git reset 4661ab9 | Removes the commits made after the mentioned commit and places HEAD on commit with said commit hash. This is a regular reset. Be aware; allthough this removes all commits after the one mentioned, the content of the files will not be reverted back to the content of said commit!! This may be useful when you want to implement these changes into another branch. | |
git reset --hard HEAD~2 | Removes the commits after the mentioned commit, places HEAD on said commit AND changes files content to this commit. This is called a hard reset. | |
Git Revert
Git revert is similar to git reset in that they both undo changes, but they accomplish it in different ways:
- git reset actually moves the branch pointer backwards, eliminating commits
- git revert creates a new commit which reverses/undos change(s) from a commit. Because it results in a new commit, you will be prompted to enter a commit message. This means its log has a track of the changes you may want to revisit.
- git revert is the preferred way of working in general, especially when working in a team because of the history being preserved.
| Command | Result |
|---|---|
git revert 123ab423 | Make a new commit but change the content of the file(s) to the hash commit, keeping the changes you are reverting in the branch history |
git revert HEAD~3 | Same as above using an alternative way to specify the commit you want to use. |
Using git revert you may also run into conflicts which need to solved manually by diffing and editing the files.
Github
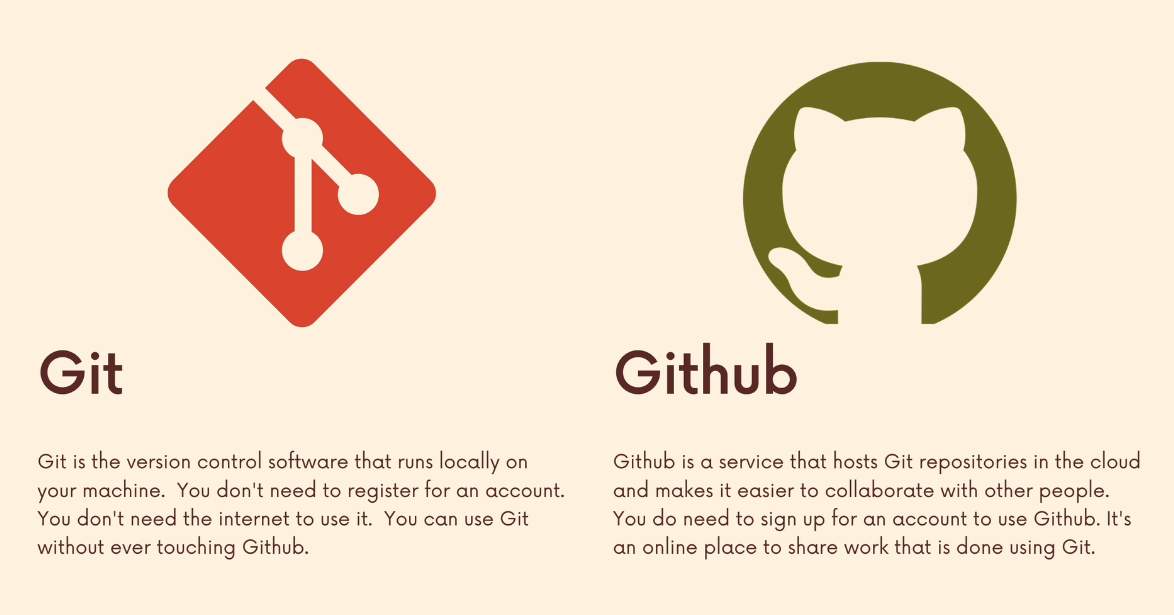
Github is a hosting platform for git repositories. You can put your own Git repos on Github and access them from anywhere and share them with people around the world.
Beyond hosting repos, Github also provides additional collaboration features that are not native to Git. Basically, Github helps people share and collaborate on repos.
There are some other tools that compete with Github providing similar hosting and collaboration features like Gitlab, Bitbucket and Gerrit but github is the absolute biggest of them all. Also Github is totally free.
Cloning
When we want to get a local copy of an existing repository we can clone this if it is hosted on github (or similar website). All we need is a URL.
git clone <url> will retrieve all files associated with the repository and copy them to your local machine. In addition, Git initializes a new repository on your machine, giving you access to the full Git history of the cloned project.
The git clone is a git command! It is not tied to Github.
Anyone can clone a repository from Github, provided the repo is public.. If you can see the repo (without being owner or collaborator) the repo is public. You don't need to be owner or collaborator to clone a repo locally to your machine. You just need the URL from Github.
Pushing up your changes to a Github repo.. that's another story entirely. You need permission to do that.
SSH Keys
For certain operations on Github (like pushing up code from your local machine) you need to be authenticated. Your terminal will prompt you every single time for your Github credentials (email and password) unless you generate and configure an SSH key!. Once configured, you can connect to Github without having to supply your credentials.
If you already have ssh keys you can use that. This would be located in ~/.ssh.
You can also generate a key:
ssh-keygen -t ed25519 -C "mailadres.com"
You can add a password phrase while generating the key. By adding the key to the ssh-agent. Another useful link: https://stackoverflow.com/questions/21095054/ssh-key-still-asking-for-password-and-passphrase
Using ~/.ssh/config you can define variables like username and key to be used for separate clients!
After generating the SSH key and adding it to the ssh-agent (needed only when you configured a passphrase) you need to go into the github settings to add the key.
Getting your code on Github
There are a few options to get your code on Github:
- Exisiting local repo on machine; if you already have an existing repo that you want to get on Github:
- Create a new repo on Github
- Connect your local repo (add a remote)
- Push up your changes to Github
- Start from scratch; if you do not have an existing repo:
- Create a new repo on Github
- Clone it down to your machine
- Do some work locally
- Push up your changes to Github
Steps needed to get your code on Github:
| Existing repo on local machine | |
|---|---|
| Go to Github and create a new repo | After doing so instructions are visible on how to proceed! |
git remote add origin git@github.com:nomind69/testing.git git remote add origin https://github.com/nomind69/testing.git | This will link the current git repo (working dir!) to the remote address. This can be https or SSH protocol. The name origin is conventional for the remote but you can use a name of your own. Most people will not change it. |
git branch -M master main | This will rename your local master branch to main (which github uses as default) |
git push -u origin main | Push work to Github (or other simular site). We need to specify the remote (origin) AND the specific local branch we want to push to that remote! Pushing multiple branches to origin (github) creates multiple branches on github as well but you need to push each local branch to github seperately! If the main branch does not yet exist on the remote location it will be created using the same branch name as the local branch! |
git push origin main:newbranch | Pushes the local branch main to a (new) branch thus creating a new branch on remote. Not very common.. |
- git push is a git commit so it will work on gitlab and alternative sites as well!
- git push without specifying branch will always push the main branch, no matter in which branch you are working in when you push! If you want to push another branch you need to specify it!
- You need to define the upstream (source) first by using the -u option with git push! After that you can use git push without additional parameters to push code (upstream)!
- git command –help shows more options. Some examples:
git push --all | push all branches to origin |
git push --prune | remove remote branches that don't have a local counterpart |
git push -n git push --dry-run | Do everything except actually send the updates |
git push -u git push --set-upstream | set upstream |
git push -v | run verbosely |
git push --progress | show progress |
git remote -v | list current remote repos |
git remote rename <old> <new> | rename remote |
git remote remove <name> | remove remote |
Fetching & Pulling
Understanding fetching and pulling is important to understand when you have to work a team on the same code.
When we first clone a repo from Github, the “master” branch on Github (remote) and local are the same:
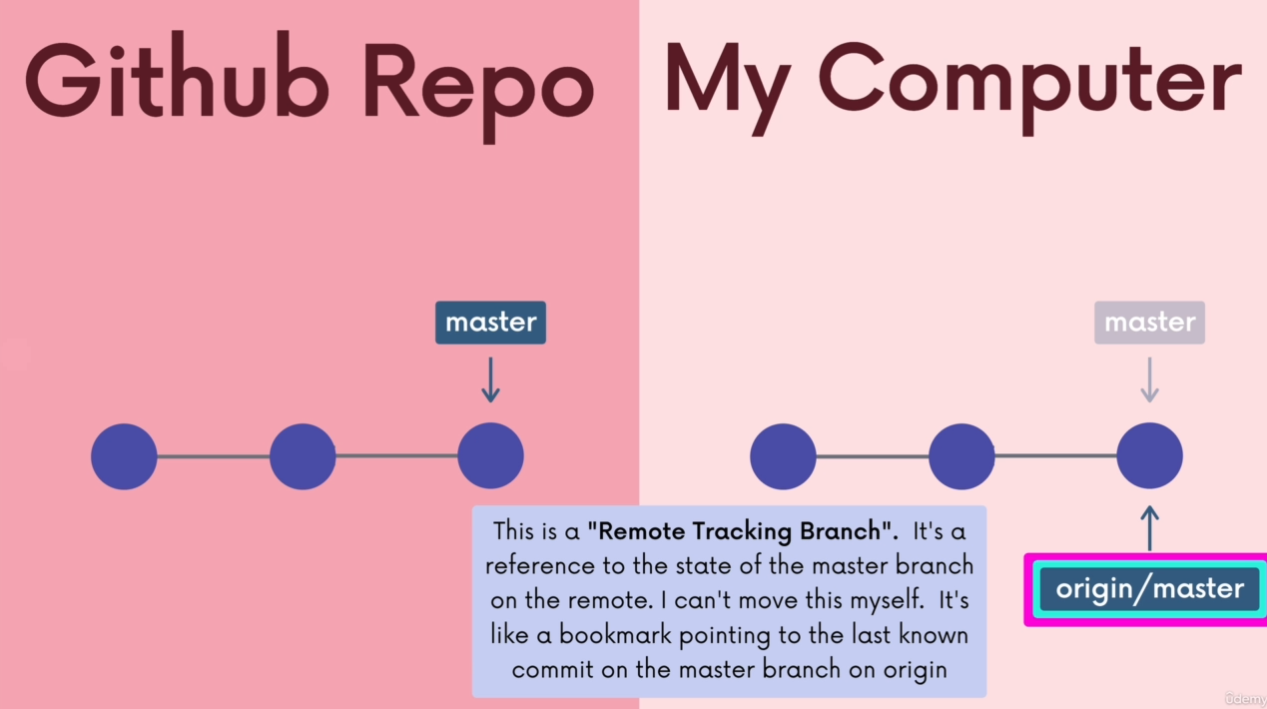
The “bookmarks” (i.e. latest commits) are the same. When we work on our local computer and we make (local) commits these bookmarks diverge which is why we use separate names.
There is a master (local) and an origin master (the remote master). This is called a Remote Tracking Branch.
Remote Tracking Branch
At the time you last communicated with this remote repository, here is where x branch was pointing.
Remote Tracking Branches follow this pattern <remote>/<branch>:
- origin/master references the state of the master branch on the remote (repo) named origin
- upstream/logoRedesign references the state of the logoRedesign branch on the remote named upstream (which also is a common remote name)
Checking Out Remote Tracking Branch
When we have committed changes locally but not pushed these changes to origin we see this when we do git status:
git status

On branch main
Your branch is ahead of 'origin/main' by 1 commit.
  (use "git push" to publish your local commits)

nothing to commit, working tree clean
If we want we can have a look at how the repo looks at origin master (so at the time we last updated from remote):
git checkout origin/main
We are now switching to origin/master leaving the local repo in “detached HEAD state”.
Working with Remote Branches
When we first clone a reposotiry, only the main branch is cloned! A tracking connection is also setup to be able to see if we are ahead on the local branch.
If we want to see which branches are available on remote we can use git branch -r
If we want to work on an alternative branch we can simply do so by:
git switch <remote-branch-name>
This will:
- create a local branch with the name defined in the command
- clone the remote branch to the newly created local branch
- set up the new local branch to track the remote branch
Of course this will only work if the name exactly matches the remote branch name!
Using git checkout, the command is git checkout –track origin/branchname
“if somebody tells you Hey I just pushed up a new branch called 'bug-fix' or 'help-me-colt-im-stuck', well I don't have that on my machine, I can easily get it by using git-switch” You can do this, but first you will have to use git fetch. Otherwise, there is no way your local repo will know about that branch. It would work without fetching if the branch existed when you cloned the repo, but if it is an entirely new branch, you will have to fetch first.
Git Fetch
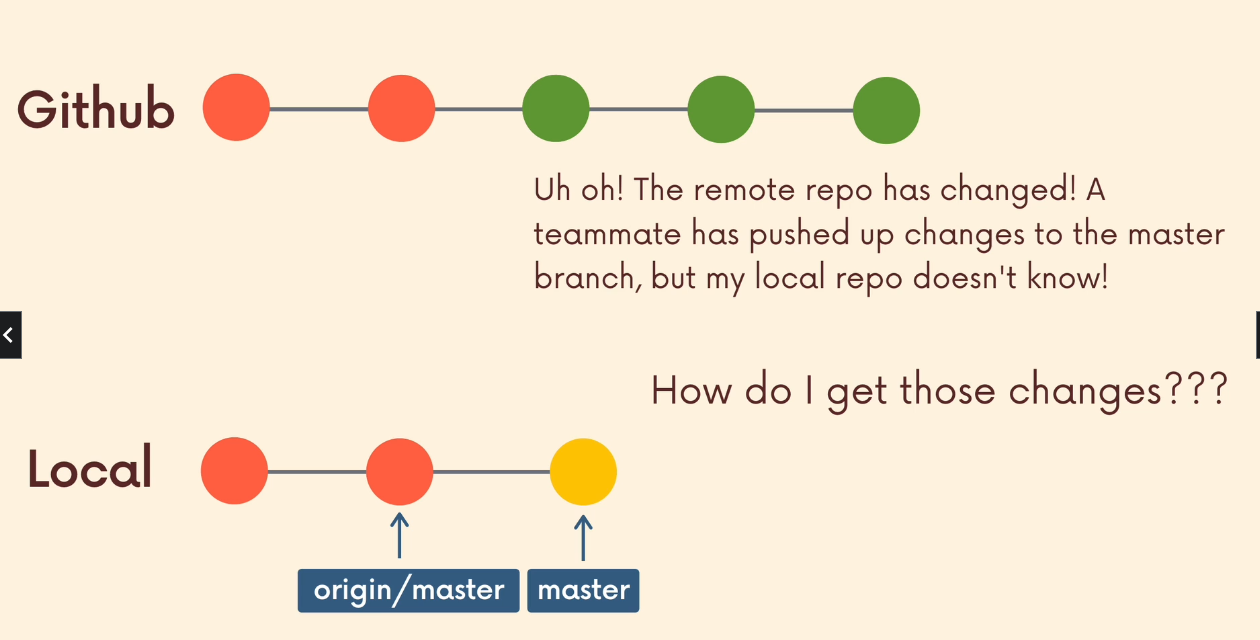
The situation:
- We cloned a github repository
- We worked on it locally (committed some changes locally)
- Somebody else has pushed changes to the remote branch that my local repo is not aware of.
This is where git fetch and git pull* come into play:
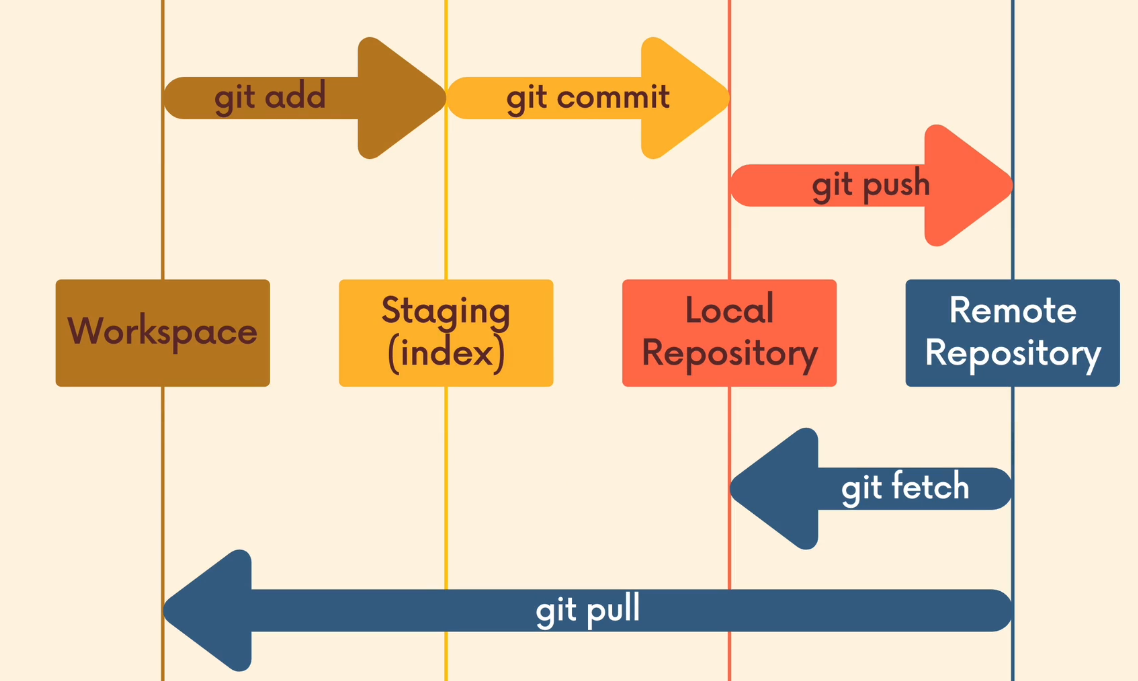
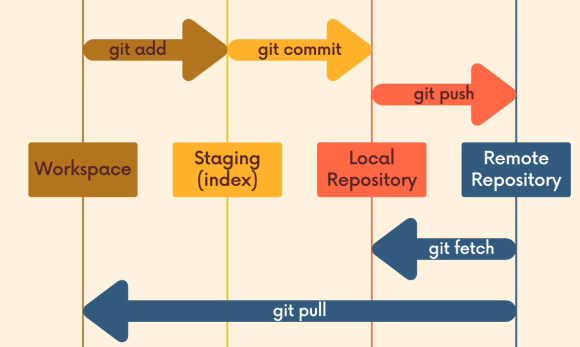
As illustrated in the image above git fetch copies the remote repo in our local repo (not in workspace as git pull does!).
Fetching
Fetching allows us to download changes from a remote repository, BUT those changed will not be automatically integrated into our working files.
It lets you see what others have been working on, without having to merge those changes into your local repo. Think of it as “please go and get the latest information from remote but don't screw up my working directory.”
So if we want to fetch the changes on remote we would do:
git fetch origin master
After doing this the situation looks like this:
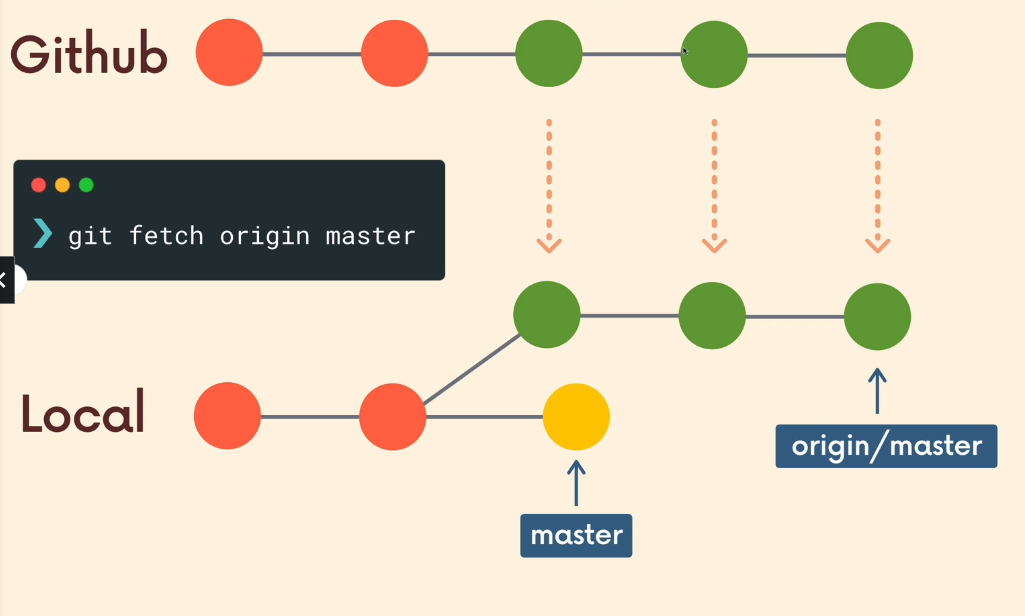
Remember that my master branch is untouched! If I want to see the changes that were pushed to origin I still need to git checkout origin/master!
This means that I do not have additional files and changes present in my working directory at this moment! If I want these changes in my working directory I have to either pull from origin or merge with my local working directory.
When we have fetched a remote which is ahead of our local HEAD, when we do git status we will see:
Your branch is behind 'origin/master' by 1 commit, and can be fast-forwarderd.
         (use "git pull" to update your local branch)

nothing to commit, working tree clean
After fetching we would normally want to look at the changes that were made on remote:
git checkout origin/master
Note: switching to 'origin/master'.

You are in 'detached Head' state...
The commands:
git fetch | same as git fetch origin |
git fetch origin | update local repo with remote repo origin (main branch!) |
git fetch origin testing | update local repo with testing branch from remote origin |
Git Pull
git pull is another command we can use to retrieve changes from a remote repository. Unlike fetch, pull actually updates our HEAD branch AND working directory with whatever changes are retrieved from the remote:
“Go and download data from Github (or other remote) AND immediately update my local repository with those changes”
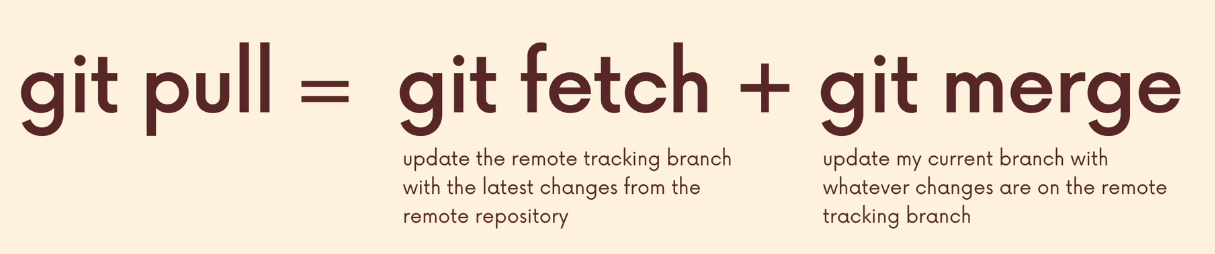
To pull, we specify the particular remote and branch we want to pull using git pull <remote> <branch> (i.e. git pull origin master. Just like with git merge, it matters WHERE we run this command from! Whatever branch we run it from is where the changes will be merged into!
These pulls can also result in Merge Conflicts which need to be solved!
Because of possible merge conflicts it is a good custom workflow to first git pull. By doing so we get aware of merge conflicts so we can solve these before pushing to remote.
Example:
Assuming a file “test.txt” where on remote this file contains regel1 and on local HEAD it reads regel2:
~/Dev/Python Drum machine (master ✔) ᐅ git branch
~/Dev/Python Drum machine (master ✔) ᐅ git branch -M main
~/Dev/Python Drum machine (main ✔) ᐅ git remote add origin git@github.com:nomind69/drummachine.git
~/Dev/Python Drum machine (main ✔) ᐅ git push -u origin main
Enumerating objects: 3, done.
Counting objects: 100% (3/3), done.
Delta compression using up to 4 threads
Compressing objects: 100% (2/2), done.
Writing objects: 100% (3/3), 833 bytes | 833.00 KiB/s, done.
Total 3 (delta 0), reused 0 (delta 0), pack-reused 0
To github.com:nomind69/drummachine.git
 * [new branch]      main -> main
Branch 'main' set up to track remote branch 'main' from 'origin'.
~/Dev/Python Drum machine (main ✔) ᐅ git status
On branch main
Your branch is up to date with 'origin/main'.

nothing to commit, working tree clean
~/Dev/Python Drum machine (main ✔) ᐅ touch test.txt
~/Dev/Python Drum machine (main ✘)✭ ᐅ vim test.txt
~/Dev/Python Drum machine (main ✘)✭ ᐅ git status
On branch main
Your branch is up to date with 'origin/main'.

Untracked files:
  (use "git add <file>..." to include in what will be committed)
	test.txt

nothing added to commit but untracked files present (use "git add" to track)
~/Dev/Python Drum machine (main ✘)✭ ᐅ git add test.txt
~/Dev/Python Drum machine (main ✘)✚ ᐅ git status
On branch main
Your branch is up to date with 'origin/main'.

Changes to be committed:
  (use "git restore --staged <file>..." to unstage)
	new file:   test.txt

~/Dev/Python Drum machine (main ✘)✚ ᐅ git commit -m "creating a pull merge conflict"
[main b5d3043] creating a pull merge conflict
 1 file changed, 2 insertions(+)
 create mode 100644 test.txt
~/Dev/Python Drum machine (main ✔)↑ ᐅ git status
On branch main
Your branch is ahead of 'origin/main' by 1 commit.
  (use "git push" to publish your local commits)

nothing to commit, working tree clean

~/Dev/Python Drum machine (main ✔)↑ ᐅ git fetch
remote: Enumerating objects: 4, done.
remote: Counting objects: 100% (4/4), done.
remote: Compressing objects: 100% (2/2), done.
remote: Total 3 (delta 0), reused 0 (delta 0), pack-reused 0
Unpacking objects: 100% (3/3), 656 bytes | 656.00 KiB/s, done.
From github.com:nomind69/drummachine
   c5af64c..58f7025  main       -> origin/main
~/Dev/Python Drum machine (main ✔)↓↑ ᐅ git status
On branch main
Your branch and 'origin/main' have diverged,
and have 1 and 1 different commits each, respectively.
  (use "git pull" to merge the remote branch into yours)

nothing to commit, working tree clean
~/Dev/Python Drum machine (main ✔)↓↑ ᐅ git pull
Auto-merging test.txt
CONFLICT (add/add): Merge conflict in test.txt
Automatic merge failed; fix conflicts and then commit the result.
Now we can manually examine the file and decide what the file should look like:
vim test.txt
<<<<<<< HEAD
regel2

=======
regel1
>>>>>>> 58f702562d629405f9812b4bea55a09fe8052d99
After we are finished editing the file:
~/Dev/Python Drum machine (main ✘)↓↑ ᐅ git status                                                                                                   (main↓1↑1|●1)
On branch main
Your branch and 'origin/main' have diverged,
and have 1 and 1 different commits each, respectively.
  (use "git pull" to merge the remote branch into yours)

You have unmerged paths.
  (fix conflicts and run "git commit")
  (use "git merge --abort" to abort the merge)

Unmerged paths:
  (use "git add <file>..." to mark resolution)
	both added:      test.txt

no changes added to commit (use "git add" and/or "git commit -a")                                                                                            /0,0s
~/Dev/Python Drum machine (main ✘)↓↑ ᐅ git add test.txt                                                                                             (main↓1↑ /0,0s
~/Dev/Python Drum machine (main ✘)↓↑✚ ᐅ git commit -m "fix merge conflicts"                                                                         (main↓1↑1|●1)
[main 1a027dc] fix merge conflicts                                                                                                                           /0,0s
~/Dev/Python Drum machine (main ✔)↑ ᐅ git status                                                                                                      (main↑2| ✔)
On branch main
Your branch is ahead of 'origin/main' by 2 commits.
  (use "git push" to publish your local commits)

nothing to commit, working tree clean
At this point we have fetched recent changes from remote, solved the merge conflicts created by the differences between the commits on remote and the commits locally. Now we are ready to push to remote:
~/Dev/Python Drum machine (main ✔)↑ ᐅ git push (origin main)                                                                           (main↑2| ✔)
Enumerating objects: 9, done.
Counting objects: 100% (9/9), done.
Delta compression using up to 4 threads
Compressing objects: 100% (4/4), done.
Writing objects: 100% (6/6), 583 bytes | 583.00 KiB/s, done.
Total 6 (delta 0), reused 0 (delta 0), pack-reused 0
To github.com:nomind69/drummachine.git
   58f7025..1a027dc  main -> main                                                                                                /2,3s
~/Dev/Python Drum machine (main ✔) ᐅ git status                                                                             (main| ✔)
On branch main
Your branch is up to date with 'origin/main'.

nothing to commit, working tree clean                                                                                            /0,0s
~/Dev/Python Drum machine (main ✔) ᐅ
DONE!
For this to work we first need to define standard behaviour in case of conflict. If you have not yet done so you will see the following text when trying to pull:
hint: You have divergent branches and need to specify how to reconcile them.
hint: You can do so by running one of the following commands sometime before
hint: your next pull:
hint:
hint:   git config pull.rebase false  # merge (the default strategy)
hint:   git config pull.rebase true   # rebase
hint:   git config pull.ff only       # fast-forward only
hint:
hint: You can replace "git config" with "git config --global" to set a default
hint: preference for all repositories. You can also pass --rebase, --no-rebase,
hint: or --ff-only on the command line to override the configured default per
hint: invocation.
fatal: Need to specify how to reconcile divergent branches.
You can prevent this by doing:
git config --global pull.rebase false
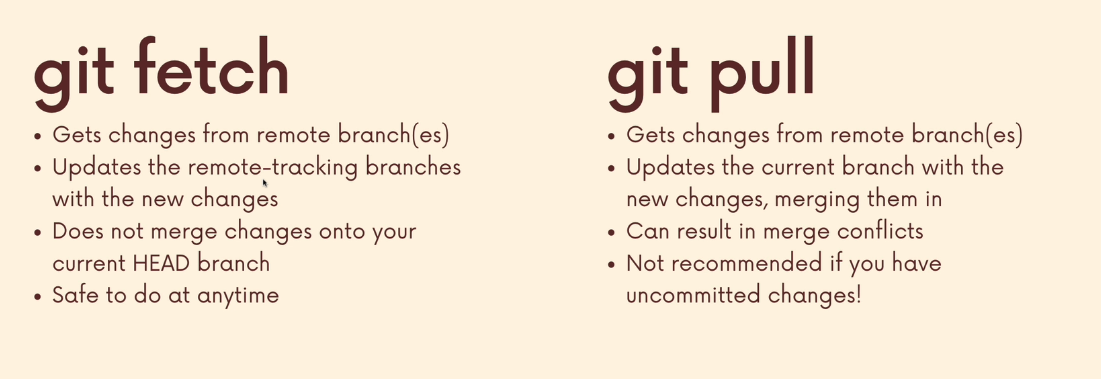
Just like running git push to push to origin master (if tracking connection was set up) we can also do git pull: if we do this without specifying a particular remote or branch to pull from, git assumes the following:
- remote will default to origin (as this is the commonly used name for remote)
- branch will default to whatever tracking connection is configure for you current branch!
This behaviour can be configured and tracking connections can be changed manually. Most people will not mess with that stuff though!
It is not uncommon to push to multiple remotes (i.e. origin and upstream) in which case we do need to specify the remote (and branch)!
Odds and Ends
Some loose ends…
Github; Public vs Private Repos
Public repository:
- accessible to everyone on the internet. Anyone can see the repo on Github
- you need to have collaborative permissions to be able to push to a public repo
Private repository:
- only accessible to the owner and people who have been granted access (collaborators)
Adding a collaborator: To grant somebody permissions to push to (private or public) repository; you go to settings - Manage access. From there you can also see who has access to this repo. By inviting somebody, using either Github account name or e-mail, you grant them access to push to the repo. The invited user needs to accept the invitation to activate the new permissions. The owner of a repo is always allowed to remove permissions from a collaborator.
READMEs
A README file is used to communicate important information about a repository including:
- What the project does
- How to run the project
- Why it's noteworthy
- Who maintains the project
If you put a README in the root of your project, Github will recognize it and display it on the homepage.
Always name it “README.md”!
README.md on Github is written in Markdown:
Some examples:
| Code | Result |
|---|---|
# h1 Heading | h1 Heading |
## h2 Heading | h2 Heading |
### h3 Heading | h3 Heading |
#### h4 Heading | h4 Heading |
##### h5 Heading | h5 Heading |
###### h6 Heading | h6 Heading |
--- ___ *** | Horizontal Rule |
**This is bold text** __This is bold text__ | Bold text |
*This is italic text* _This is italic text_ | Italic text |
~~Strikethrough~~ | |
Check the URL for more information
Visual Studio Code has a nice extension for Markdown!
Github Gists
Github Gists are a simple way to share code snippets and useful fragments with others. Gists are much easier to create, but offer far fewer features than a typical Github Repository. Gists can be created by going to https://gist.github.com and sharing the URL. This link can also be found in the meny clicking on your profile.
Gists, like repositories, can be private or public.
Typically gists are used for single files where repositories are used for multiple files which are connected in some way.
By going to "all gists" you can browse gists from other people as well.
Github Pages
Github Pages are public webpages that are hosted and published via Github. They allow you to create a website simply by pushing your code to Github.
It is a hosting service for static webpages, so it does not support server-side code like Python, Ruby, or Node. Just HTML/CSS/JS!
You can create a Github page by visiting https://pages.github.com where you can also find a tutorial on how to use pages. Often these pages are referenced from a repository on Github to display something (i.e. a demo of working code).
Github Pages comes in 2 flavors:
- User Site: You get one user site with your Github account. This is where you could host a portfolio site or some form of personal website. The default url is based on your Github username, following this pattern: username.github.io though you can change this!
- Project Sites: You get unlimited project sites! Each Github repository can have a corresponding hosted website. It's as simple as telling Github which specific branch contains the web content. The default urls follow this pattern: username.github.io/repo-name.
To create a github page for a project it is good practice to create a seperate branch only containing a 'index.html' file. This way the main branch does not have to have this file. Another option is to create a folder named “docs” and create the index.html in there. You can activate the github page for a project under profile - settings.
Git Collaboration Workflows
Centralized Workflow
In this model everyone works on Master/Main branch. It is the most basic workflow possible. Very straightforward and can work for tiny teams but it has quite a few shortcomings!
In this model every developer clones a repo from Github (single branch), works on the code and commits locally. The first person to push to remote is accepted but the second person trying to push to remote will fail because of merge conflicts. He/she will first have to git pull the changes from remote, merge the remote changes with changes in their local commits (and solve merge conflicts if applicable) before pushing to remote again.
While it's nice and easy to only work on one branch, this leads to some serious problems on teams:
- Lots of time spent resolving conflicts and merging code, especially as team size scales up.
- No one can work on anything without disturbing the main codebase. How do you try adding something radically different in? How do you experiment?
- The only way to collaborate on a feature together with a teammate is to push incomplete code to main branch. Other teammates now have broken code.
Feature Branches
Where “Centralized Workflow” equals “everybody works on main branch”, Feature Branches Workflow equals nobody works on main! Branches are created for bugfixes, functionality, etc.
This a very commonly used workflow. Rather than working directly on main, all new development should be done on separate branches:
- Treat the main branch as the official project history
- Multiple teammates can collaborate on a single feature and share code back and forth without polluting the main branch
- The main branch won't contain broken code
Merging in Feature Branches
At some point the new work on feature branches needs to be merged into the main branch. There are a couple of ways to do this:
- Merge at will; without any sort of discussion with your team. Just merge whenever you want. Not very common…
- Contact your team to discuss if the changes you made should be merged into main. This is more common way of working.
- Pull requests! Most commonly used method of merging feature branches into main branch.
Pull Requests (PR)
Pull Requests (PR's) are a feature built in to products like Github & Bitbucket. They are NOT native to Git itself.
Pull requests allow developers to alert team members to new work that needs to be reviewed. They provide a mechanism to approve or reject the work on a given branch. They also help to facilitate discussion and feedback on the specified commits.
“I have this new stuff I want to merge into the main branch. What do you all think of it?”
The workflow of PR's
- Do some work locally on a feature branch
- Push the feature branch to origin / Github
- Open a Pull Request (PR) using the feature branch that you just pushed to Github
- Wait for the PR to be approved and merged. Start a discussion on the PR. This part depends on the team structure.
You create a PR from Github itself (or Bitbucket, Gitlab, etc.) where you can specify which branch you want to merge and into what branch. You can give the feature a name and leave a comment.
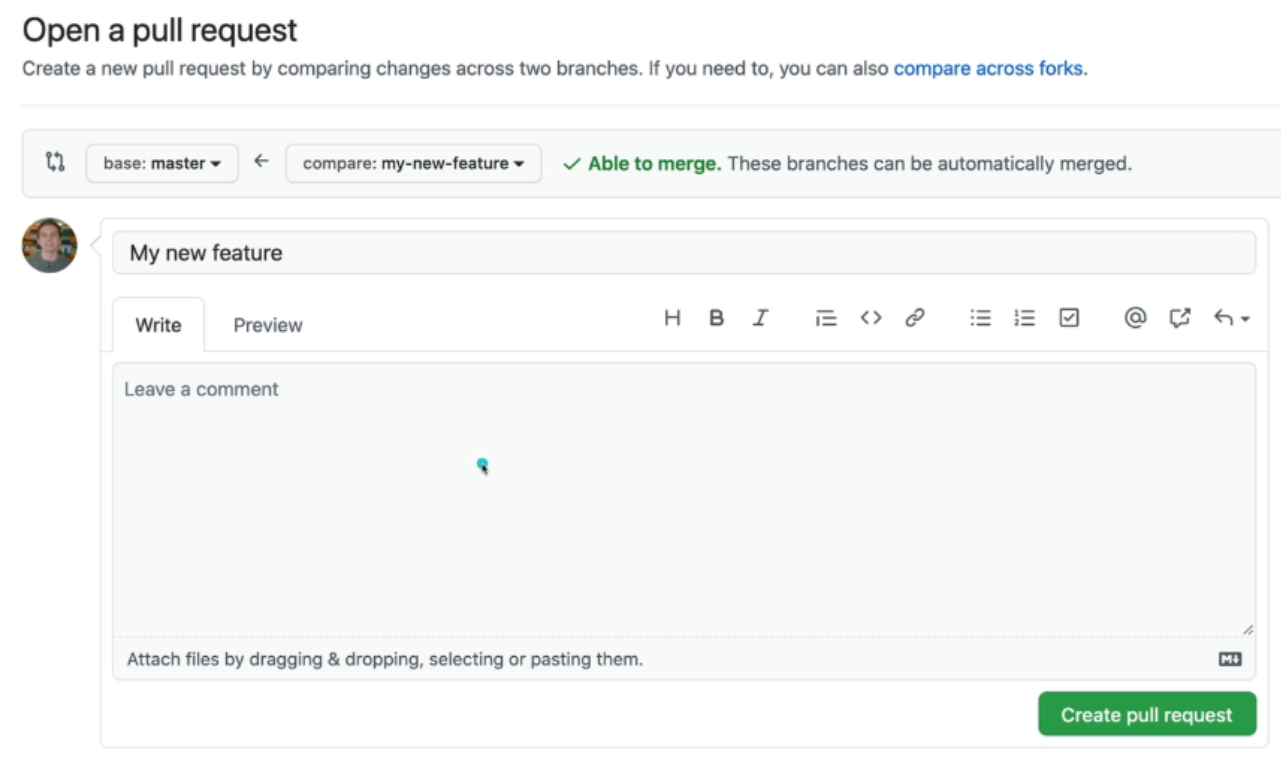
After creating a PR one of these can happen:
- The PR is accepted and the feature branch is merged into the main branch
- The PR is not accepted and closed.
- A discussion is started where multiple people can discuss what needs to be done before the feature branch is merged into main.
Instead of creating a PR you can also do a comparison between your feature branch code and the main branch code (or other branch but comparing it to main branch would most likely be the most logic branch to compare to as you seek to merge your feature branch into main branch). Github will then tell you about merge conflicts if they exist!
Github will also tell you about merge conflicts upon creating a PR.
If the feature branch gets merged into the main branch, there is a new commit which is only present on Github! This means that the developers need to pull for the latest commit.
After merging Github shows a button to delete the feature branch from Github.
You can configure Github to only allow certain people to approve a PR and merge it into main!
Merge Conflicts
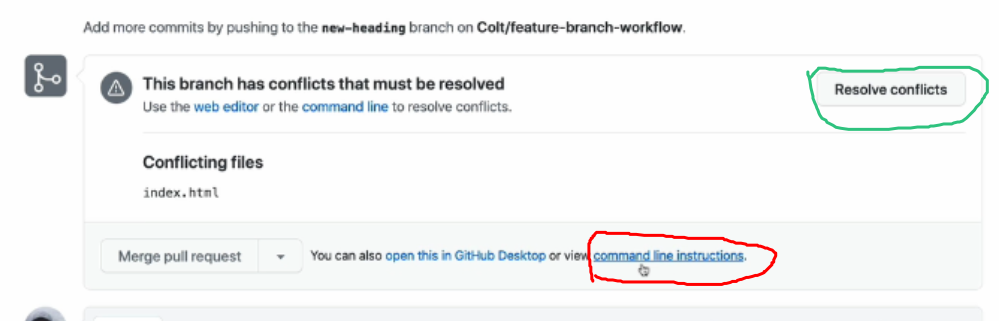
Just like merging commits locally, a PR can result in a merge conflict. Github offers the option to open the related file(s) and resolve the conflicts from within the browser (screenshot below, green option)
Another option to resolve merge conflicts is also offered on Github: resolving it from the CLI (screenshot below, red option). Clicking this will tell you what to do.
Options offered by Github:
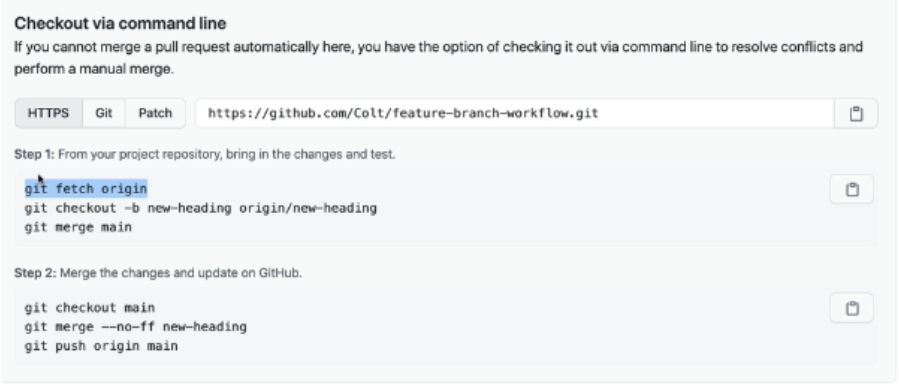
Instructions to solve the merge conflict(s) locally:
Apparently the way of working now is to (locally) merge the main branch into the feature branch (so the other way around) and fix the conflicts in the feature branch! This way the main branch does not get polluted with bugs. After fixing the merge conflicts we can switch to main branch and merge the feature branch (which is now without conflicts) into the main branch without any issues.
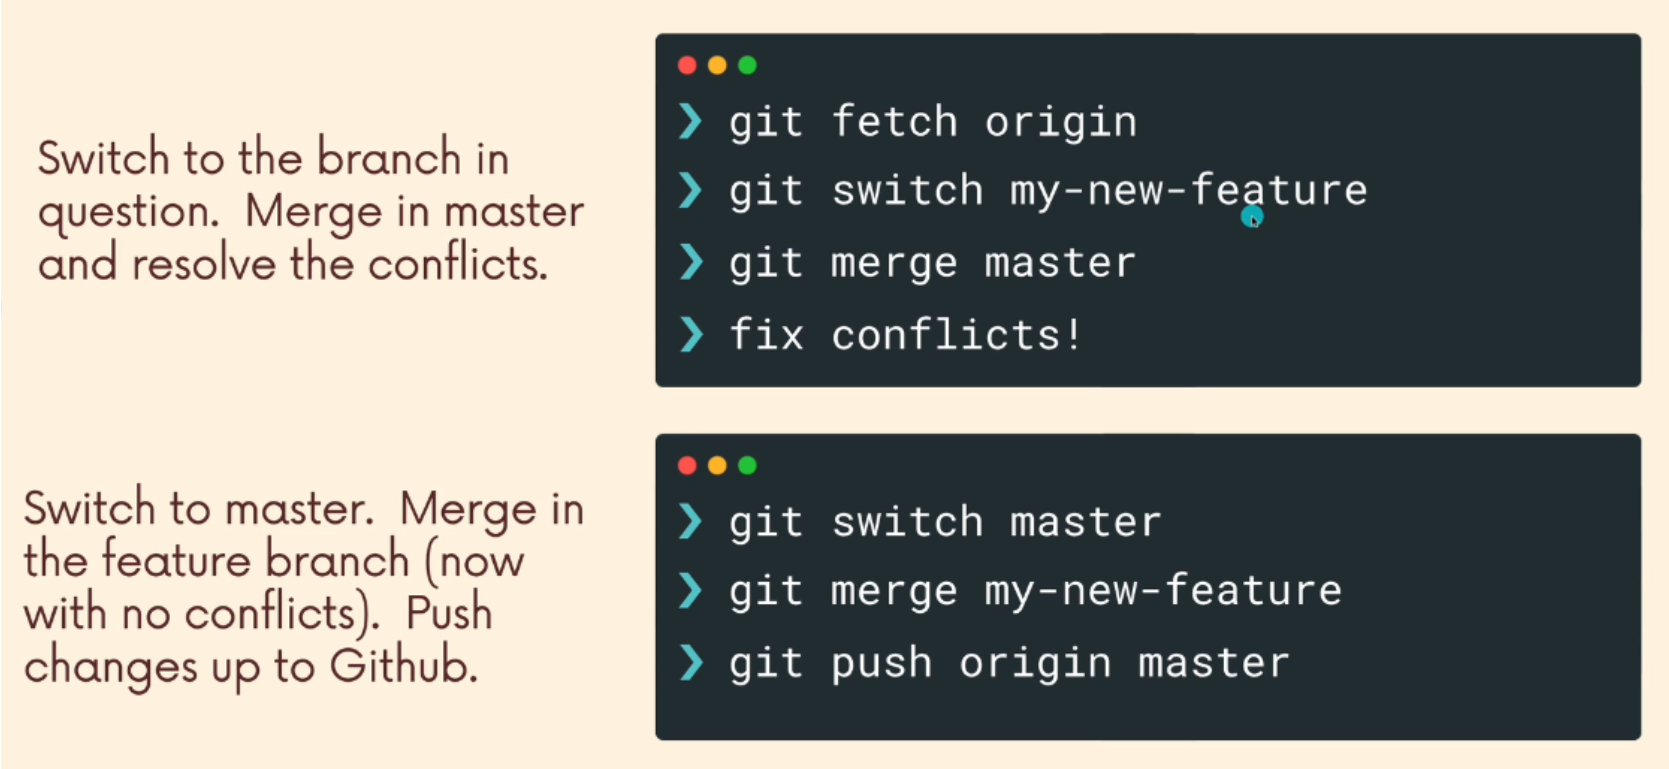
Github will display the exact commands based on branch names!
After these instructions the main branch is up to date on Guthub and needs to be pulled by the developers to get the latest version.
Protecting Branches
We can configure some settings to protect branches. In a large team we don't want everybody be able to push to every branch!
These settings can be configured by the owner of the repository under settings - branches:
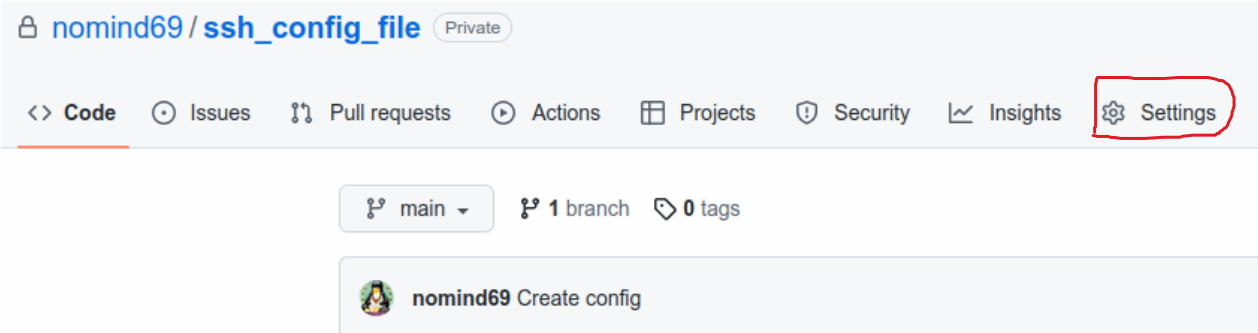
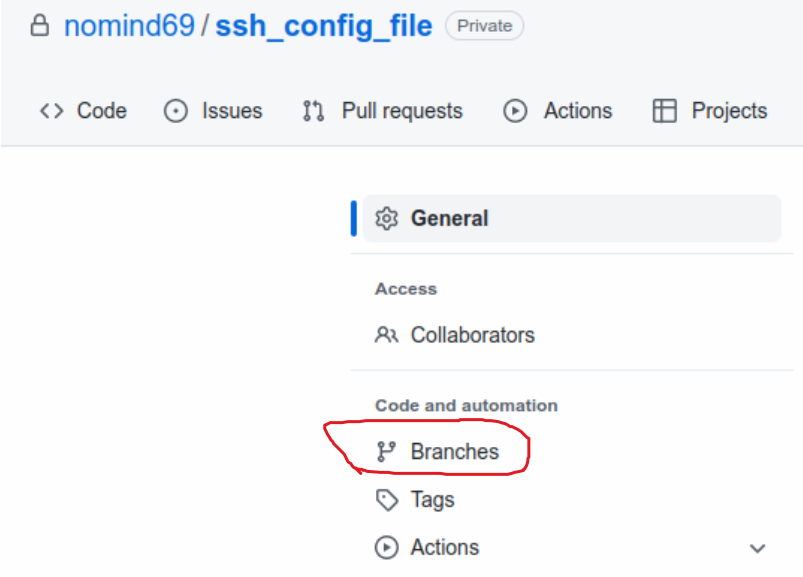
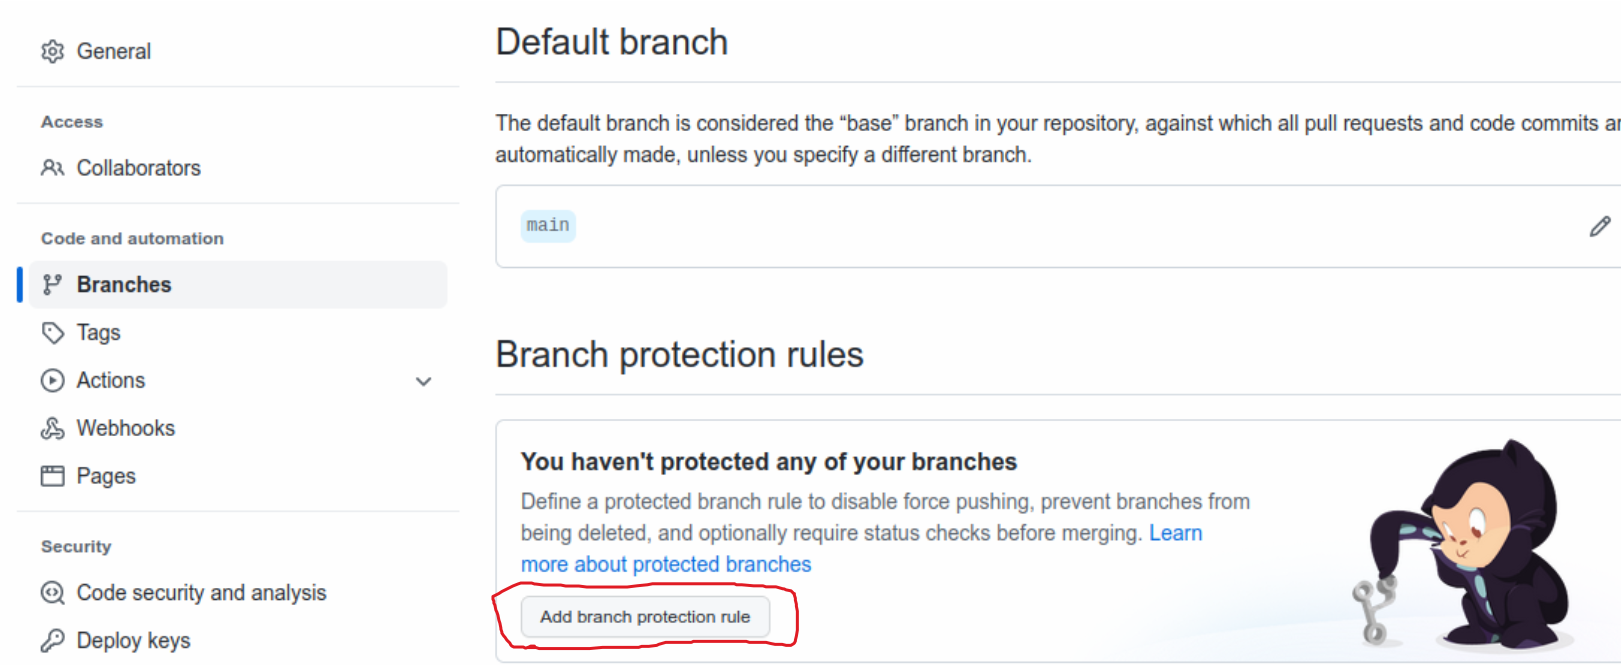
Now you can set a number of settings based on branch name patter (because of naming conventions in companies) like requirements for:
- PR before merge
- Status checks before merge
- Conversation before merge
- Verified signature
- Linear history
- Successful deployment (OTAP)
- …
Fork & Clone; Another Workflow
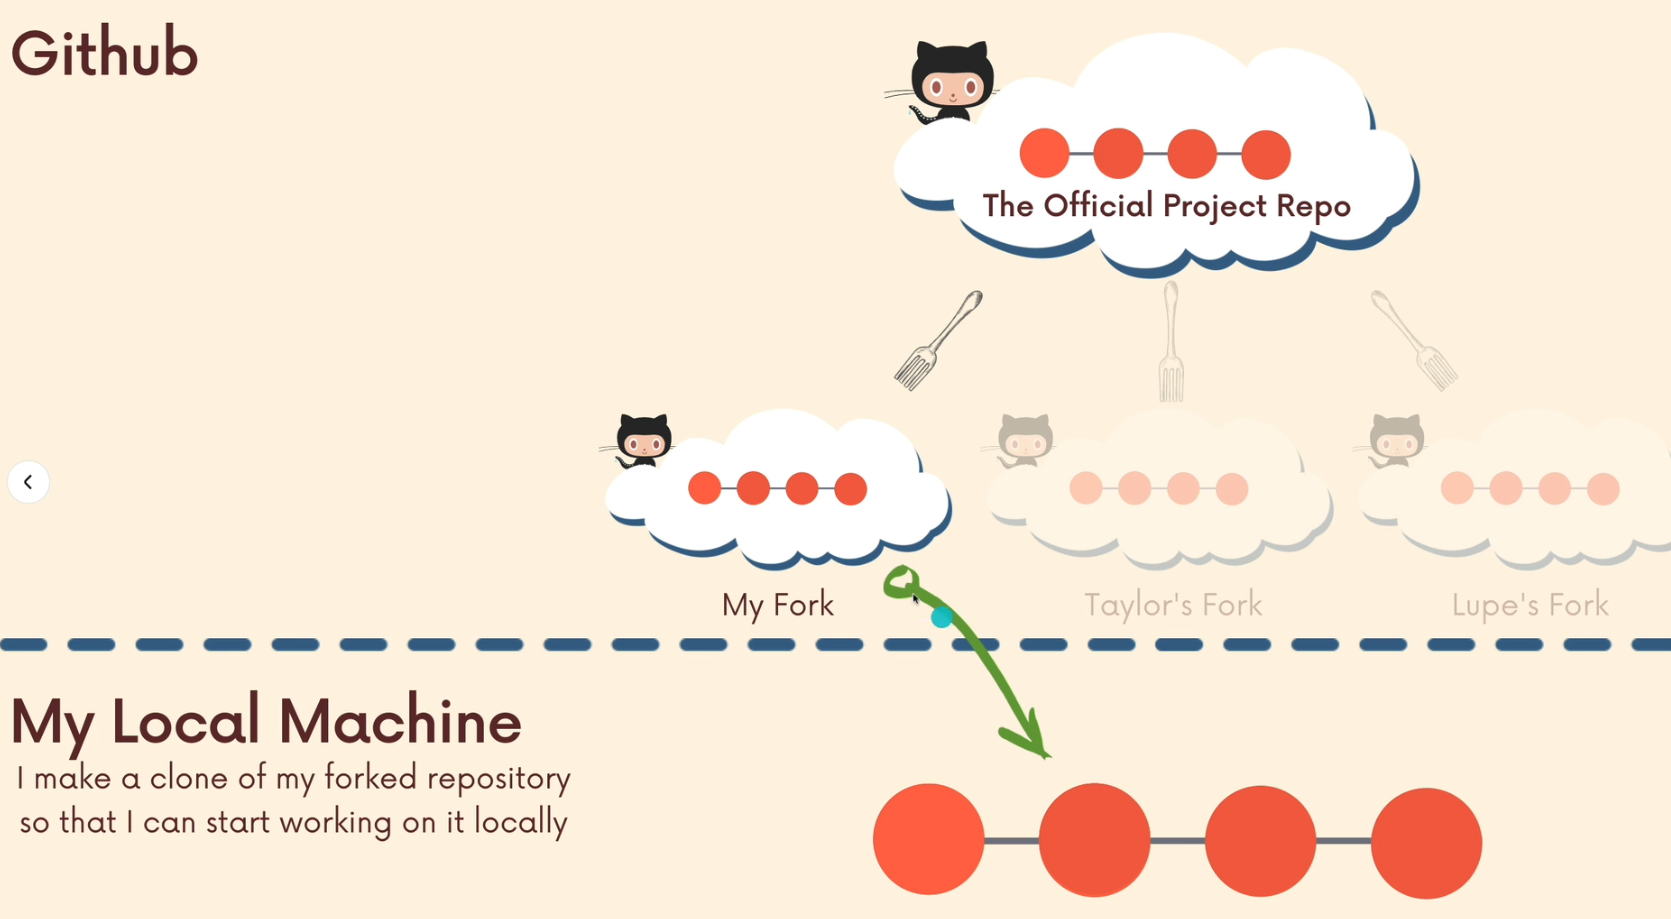
This workflow is different from the previously discussed workflows; instead of just one centralized Github repository, every developer has their own Github repository in addition to the “main” repository. Developers make changes and push to their own forks before making pull requests.
This workflow is very commonly used on large open-source projects where there may be thousands of contributors with only a couple of maintainers.
Forking
Github and (simular tools) allow us to create personal copies of other peoples' repositories (on Github). We call those copies a fork of the original.
As with Pull Requests, forking is NOT a Git feature.
When we want to fork a Github repository we do NOT clone it! Instead, look for the button top right Fork! 
Forking Workflow
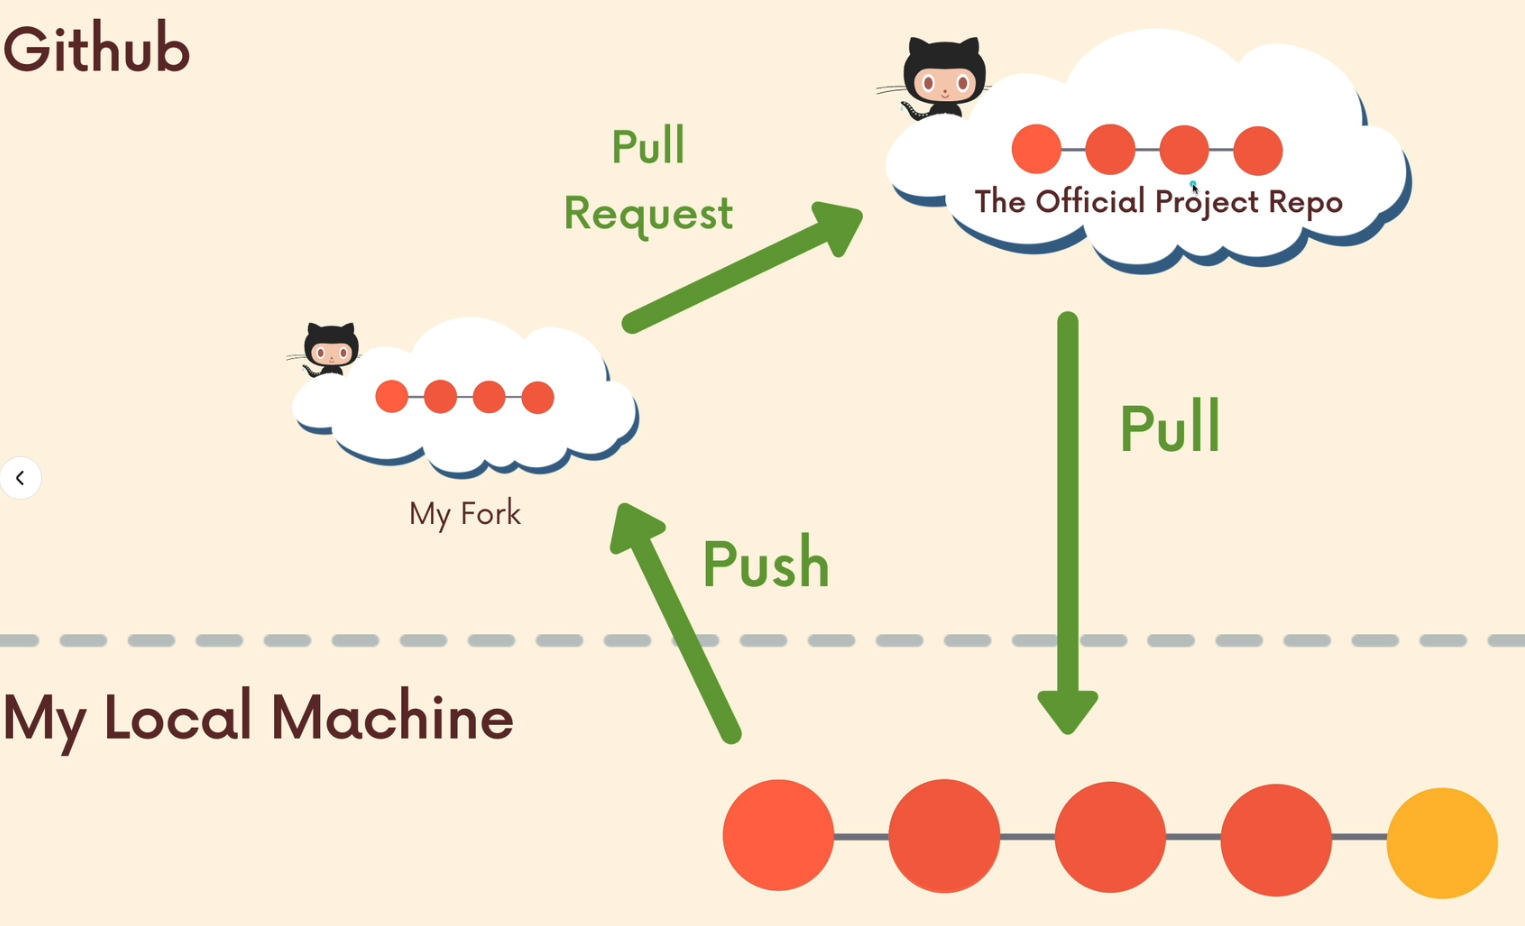
The workflow now would be:
- Fork a repository
- Clone the forked repository to your local machine
- Add upstream remote (original repository)
- Work on the code (remember feature branches)
- Commit locally
- Push to remote (forked repository)
- Make a Pull Request for the maintainers
- If PR is accepted and merged into upstream main: pull upstream
Besides forking and working on our own repository, we also would want to link to the original repository to fetch changes made by other developers on the repository:
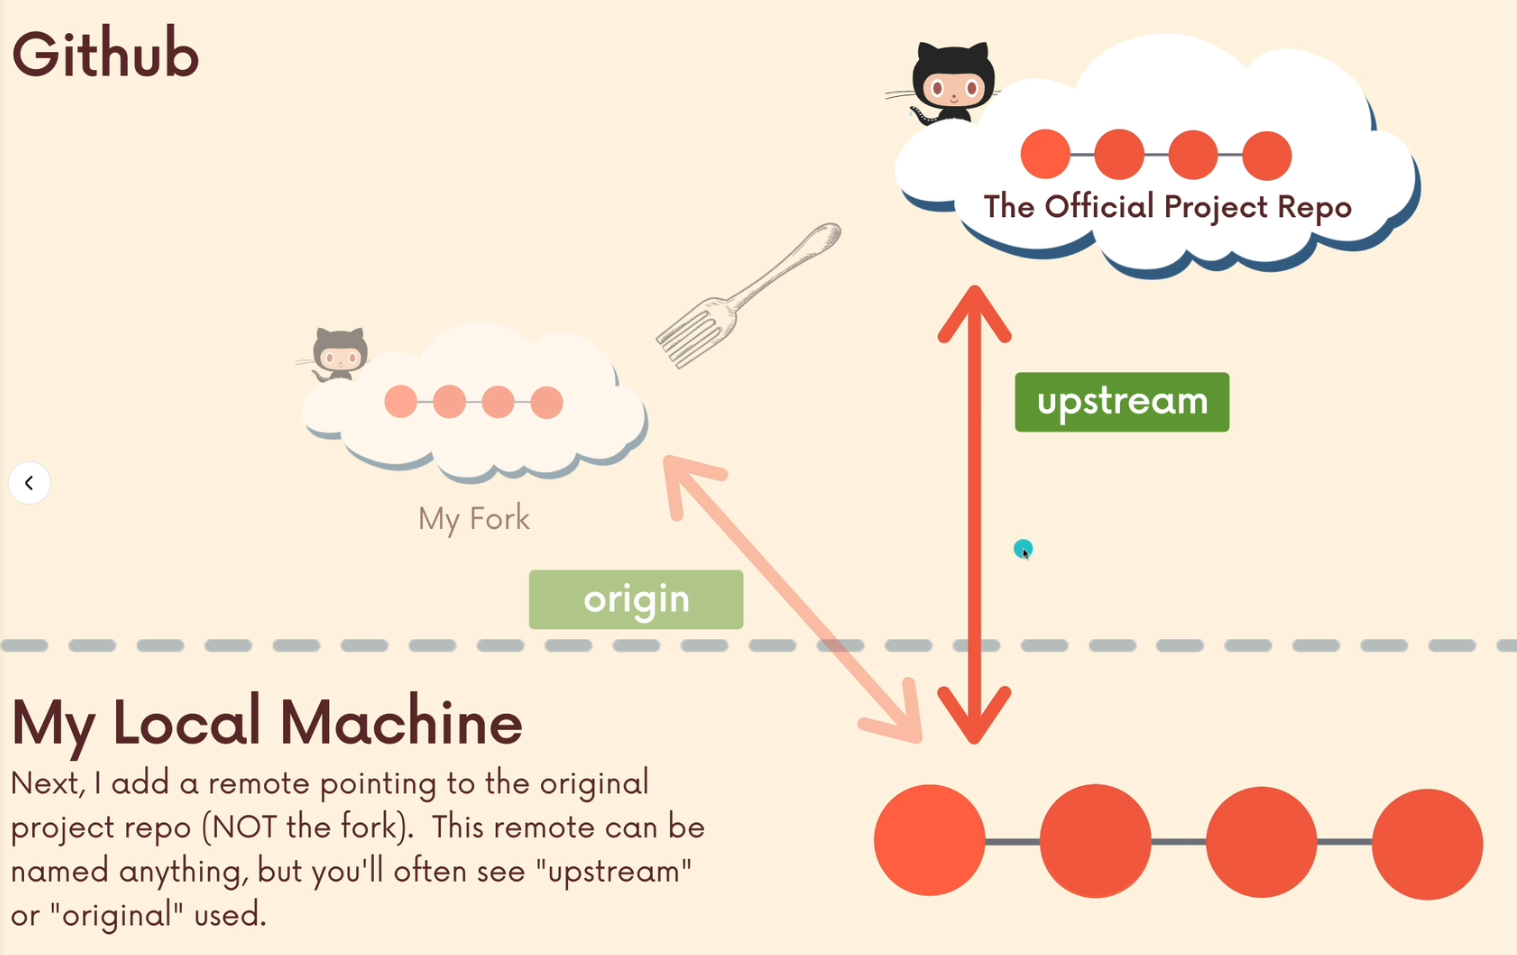
As you can see in the picture above, the remote from which I cloned the (forked) repo locally is called origin. As we want to merge changes made by others in the original repo, we want to link to this repository as well. It is custom to name this link upstream or original.
After pushing to the Forked Repo, Github will tell you if your repository differs from the original repository:

We can easily make a PR or examine the differences from here!